
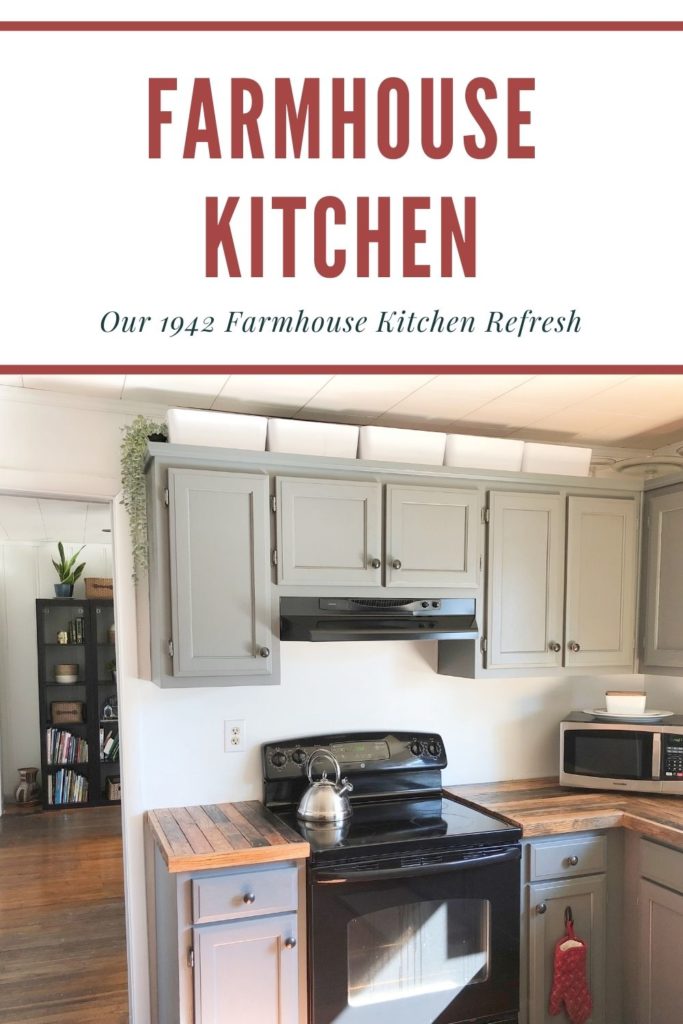
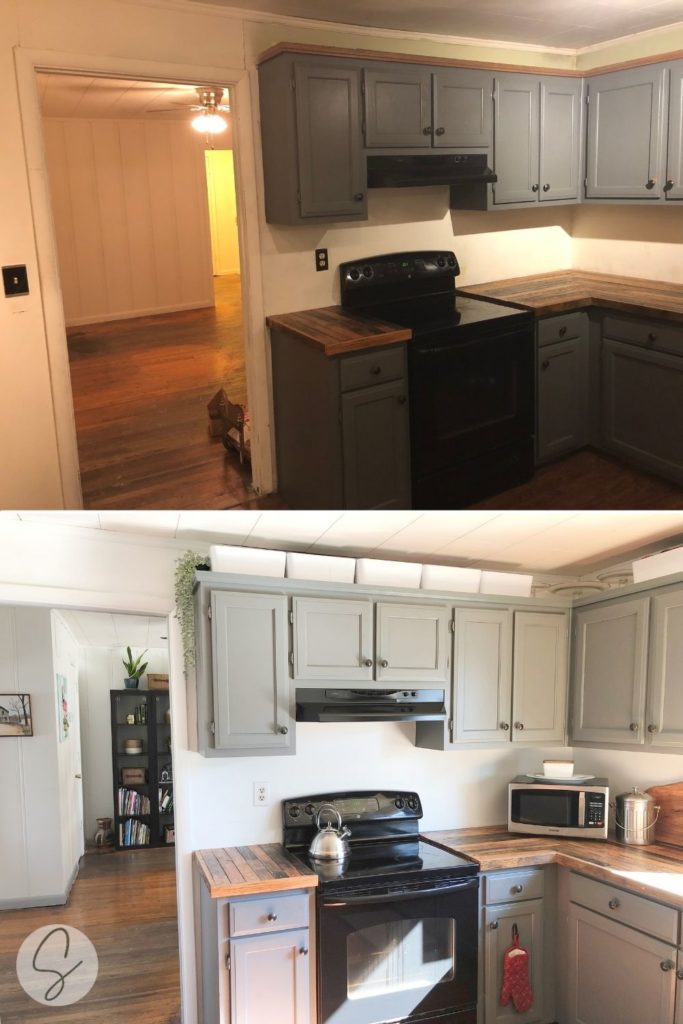
A tour of our farmhouse kitchen from our 1942 fixer-upper. This room needed a refresh and had some major organizational issues. Here’s what we did!
This post contains affiliate links. That means if you click on my link and buy something, I will earn a small commission from the advertiser at no additional cost to you. Read my disclosure policy here.
In 2020, Chris and I sold our little two-bedroom condo in the suburbs and moved our family of 5 into an even smaller fixer-upper farmhouse in the middle of nowhere. It was a dream come true and an absolute disaster, but over the last year, we’ve worked hard to make this space our own.
Chris and I are not experienced DIY-ers (we don’t even like hanging photos together), but we’re good at living on a budget – and who doesn’t love watching someone else’s hot mess?
You can watch our videos on my YouTube Channel and get all the details about this project below!
By far and away, when I asked Instagram followers what room you wanted to see first, you said the kitchen. So here’s our little farmhouse kitchen.
Kitchen Makeover
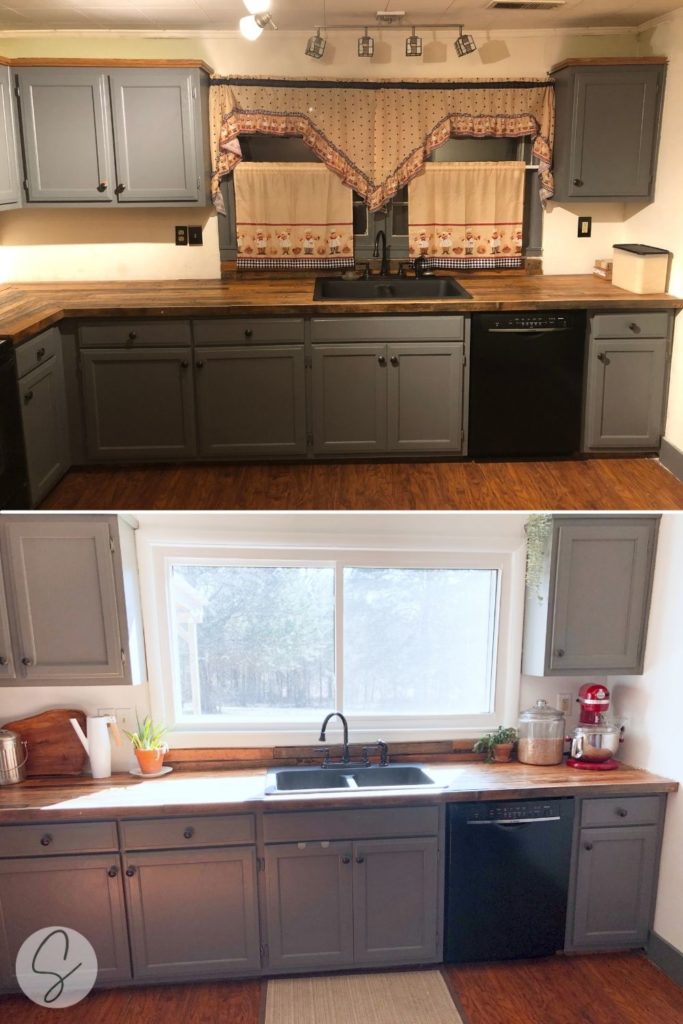
First of all, this was not a renovation. Not even a little bit.
I use the term makeover lightly. We already loved the countertops and cabinet color, so everything we did in here was functional, organizational, or just needed to be refreshed.
But all of these little touches took the kitchen from feeling disjointed, dirty, and disorganized to efficient, clean, and pretty – with a lot of farmhouse charm.
Eventually, I would like to do some big projects – finish the other half of the kitchen, maybe pony the wall between the kitchen and dining room to open it up and add a big eat-in island.
But that’s for another day, on another budget.
For now, we needed to repair, refresh, organize, and make this kitchen our own.
Here’s what we did:
New Here? Here are the house videos you missed!
– Our first home (a small condo we paid cash for and lived there with 3 kids)
– The farmhouse (before shots)
– Phase 1 Farmhouse Reno (major repairs)
Windows:
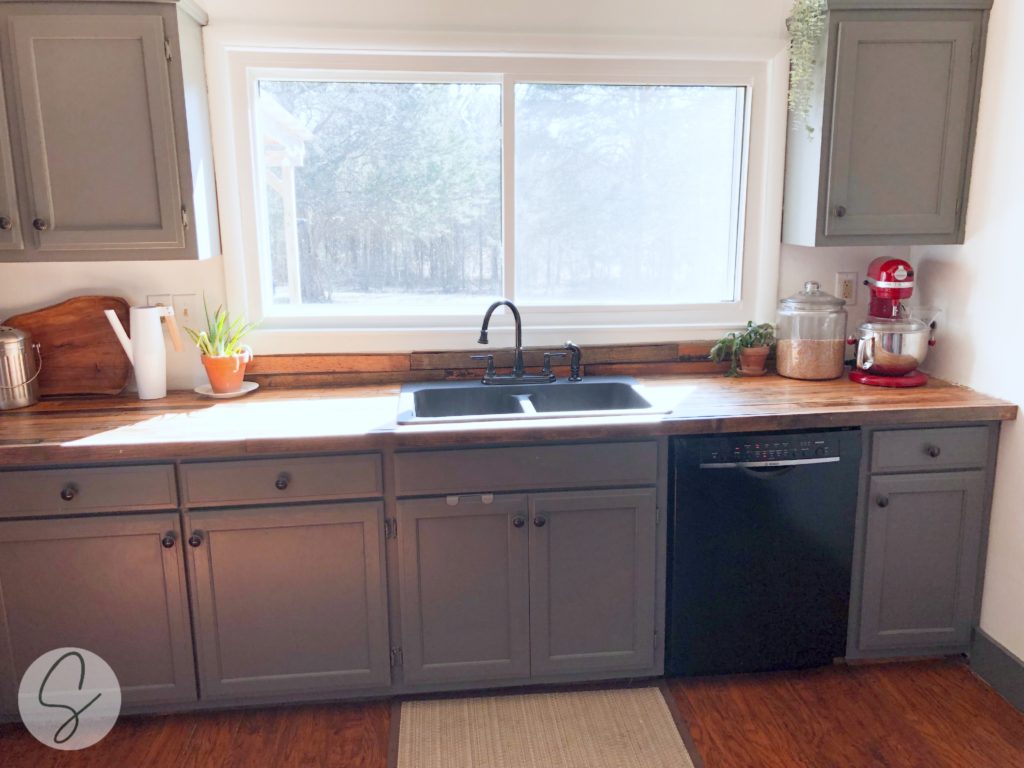
As much as we loved the look of the original windows, most of them were broken, rotting, and filled with several inches of dead wasps. We replaced all of the windows in the house.
Since our house has very little natural light, and it’s a simple ranch-style (nothing special from the 1940’s) we installed huge sliders that bring in a ton more light than the old ones.
After getting several quotes, we went with Window World for the entire house. They were fantastic, budget-friendly, and have even come out several times after the install to fix old-house issues that needed adjusting after the windows had settled into their new homes.
About the kitchen window in particular: I loved how big it was, and I honestly loved the style of the old window (including the dark blue/gray painted grid). But it blocked a lot of light, was missing a screen, and had been painted shut.
We replaced it with the huge slider that lets cross breezes in when it’s warm (old houses were designed for this since they were built before air conditioning), and we painted the trim around the outside. It makes the room look bigger, brighter, and cleaner.
Paint:
Cabinets & Baseboards
Since we already liked the cabinet color, we found a sample of it in the garage and used it to finish painting the baseboards around the kitchen (which had been left white), the wood moulding along the top of the cabinets, and touch up the scratches on the cabinets.
Unfortunately, the sample didn’t have the paint name, so we haven’t figured that out yet. The paint looks like the basic dark gray, but on the cabinets, it looks blue-gray.
Walls
The walls were really dirty, so they got a fresh coat of bright white. I painted the garage door, trim, and window trim the same color.
I’ve tried several different kinds of paint – from really cheap to more expensive. This time, we used Behr Ultra Paint & Primer. It was a little expensive, but it gave us great coverage over old, dirty, walls with only one coat. The benefit of having a small house was that it didn’t take that much paint to refresh the entire thing.
- Paint color: Sherwin Williams 7006 “Extra White” (it has blue tones)
- Kitchen Walls: Behr Ultra Satin finish
- Door and trim: Behr Ultra Semi-gloss finish
Added Storage & Countertop:
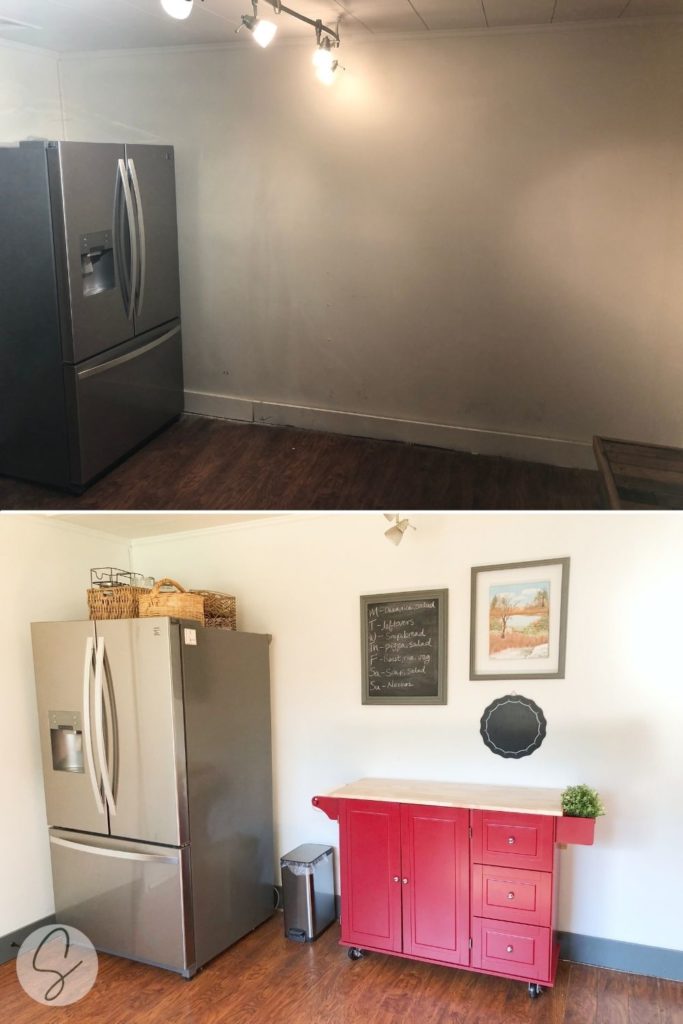
The kitchen only had cabinets and countertops in one-half of the room. The other half had a fridge plugged into the wall and nothing else. Since we are saving up for some major reno projects (and spent the first year here replacing windows, setting up heat and AC, fixing electricity, and replacing the septic), we fixed this with a few budget-friendly tweaks that work for now.
Rolling Kitchen Island
We got this rolling kitchen island with a drop leaf for more storage space and counter space. It has a built-in paper towel holder and a small shelf we use for jars of loose-leaf tea. We use the countertop constantly, and the cupboards currently hold our plates, bowls, cups, and mugs (so the kids have easy access).
It was my biggest investment in the kitchen
Pantry Shelves
We don’t have a pantry here, so I added a little more food storage by installing pantry shelves on the back of the garage door. I got mine at Target, and this shelf and this one are similar.
Above the Cabinet Storage
Because I run and food blog and like to entertain, I have a decent amount of supplies for food photography and serving guests. I don’t need to access these all the time, but they do need to be easier to grab than in a box in the barn. Right now, the best place to store them is on top of the upper cabinets.
In order to keep the kitchen from looking cluttered, I got these clean white storage bins from Ikea, which were the perfect height for our low ceilings, and stored everything in there.
While I’m a minimalist at heart, a lot of these items are family heirlooms, so I’m keeping them.
We don’t live near an Ikea, so I waited until we visited family, made a trip there, and bought just a few things we could bring back with us.
These bins were less than $3.50 each at Ikea, vs. similar styles I found everywhere else for more like $10+ each.
- White VARIERA storage bins from Ikea (for above the cabinets): $3.29/each, $24 total
Produce & Cookbook Shelf
Finally, in the corner of the kitchen, I put a small shelf Chris had before we were married. After repainting it with leftover wall paint, I used it for fresh produce (so it’s easy for the kids to reach) and cookbooks. I wanted easy access to these things, but they didn’t need to be on the counters or in cabinets.
Small produce & cookbook shelf: free, because we used a shelf we already owned and leftover paint.
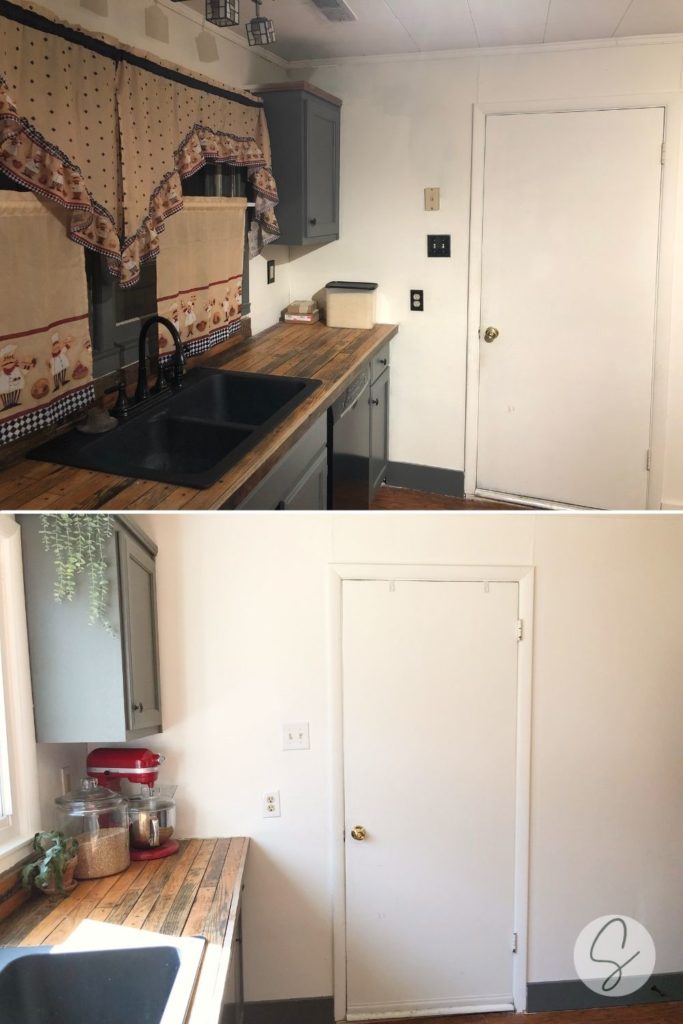
Under the Sink
In order to keep the area around the sink clean and uncluttered, we put this over the door cabinet organizer under the sink. It’s technically for bathrooms, but it’s also perfect for sponges, steel wool, and sink stoppers.
- Over the door cabinet organizer: $20 (more than I would probably pay now, to be honest)
Small Touches:
These were both functional and aesthetic.
- Moved the fridge so it was facing the sink instead of the kitchen door
- Removed, puttied, and painted over several empty/obsolete outlets.
- Replaced black or mismatched outlet covers with white ones to match the wall.
- Added a few real and faux house plants
- Chalkboard menu and other wall decor on the blank wall above the kitchen island.
Kitchen Makeover Plans
Honestly, the kitchen was the room that was in the best shape when we moved in. So everything we did here was very functional and minimal compared to other rooms.
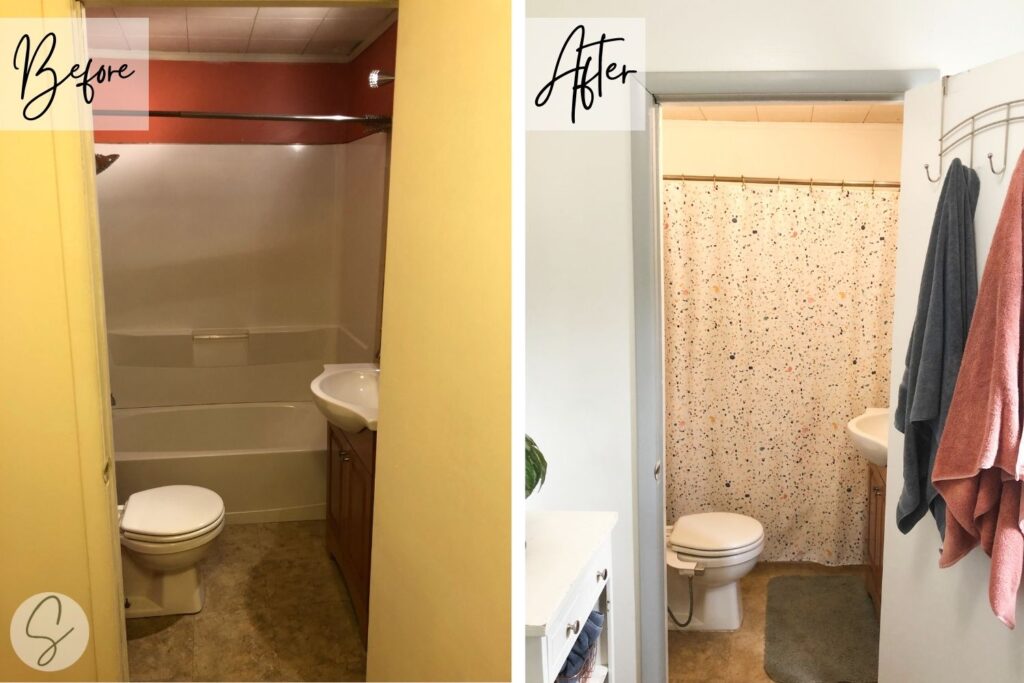
There are so many things we can do in this space. But we have a huge list of things that take priority – like adding a bathroom and upgrading the tiny, dirty bathroom that came with the house. We’re cash flowing every repair and upgrade, and so we need to work through everything methodically.
We also don’t know how long we will live here, so we’re trying to balance what will help us sell the house easily in the future and what we want while we live here.
Pingback: Minimalist Home Tour: Our Debt-Free Townhome • Stephani Jenkins
Pingback: Before Tour of Our Fixer-Upper Farmhouse • Stephani Jenkins
Pingback: Farmhouse Phase 1 Repairs • Stephani Jenkins
I would do the bathroom next. We bought a really old house once and did a lot of the same things to the kitchen as you did. Painted the walls white opposite the windows white for brightness white to reflect the light and an accent wall a beautiful blue.
We started with the bathroom because it was absolutely gross. My husband went ahead of me to do that while I was selling the home we were in. I don’t think I would have made it through the bathroom renovation. Anyway we got the whole house fixed up to where we loved it , then sold it, because that’s what we do (sigh!).
Now we are in another home in another province, very expensive province I must add, and we are at fixing this place up. That is after my husband said he was not investing a penny in it to upgrade. However, we got it for a song and you can’t do that without having to invest some money. So we are now slowly upgrading as well as working on the debt. Not a good situation I know.
I really enjoy watching people’s diy renovations so keep up the videos!
Thanks for the comment, Lorraine! I’m planning to share the bathroom for our next room tour! It needs a big update and some repairs, but we did a quick makeover almost as soon as we moved in, because yeah,… old bathrooms. :/
Pingback: Our Bathroom Makeover • Stephani Jenkins